JimDoty.org

Home
Gallery
Nature
Travel
Learn
Tips
Digital
Links
About

E-mail

Search

Prints for Purchase

Support This Site

My Photo Blog
 

This site in:
English 
Espanol  
Francais 
Deutsch  
Italiano
Português

Combining Images 2

Planning Ahead To
Erase and Combine Images
Jim Doty, Jr.

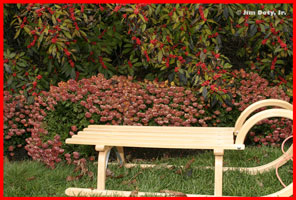
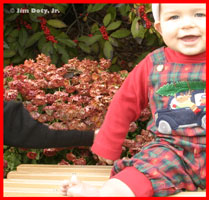
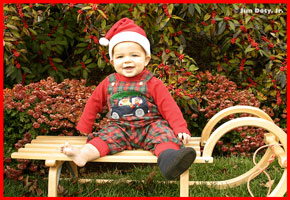
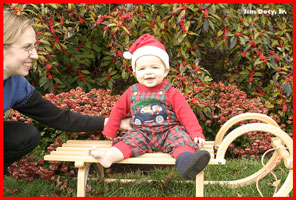
The goal was to photograph this boy on a German sled. Although he would sit just fine on the floor or ground, he teetered precariously when we put him on the sled. In order to take the photo, his mother needed to support him. The plan was to digitally remove her hand and arm later.

When I had taken several photos and had one I liked, I had his mother lift him off the sled and step back. It was important that the sled did not move. I photographed the sled and background without the boy. I was doing all of this hand held, so I did my best to keep the camera in the same place.

The "background" photo of the sled and bushes.

I combined the images in Photoshop. I opened the sled image first. Since the photos were shot handheld, I increased the canvas size around the sled (Image>Canvas Size) to allow room to drop in the other photograph. Then I opened the photo of the boy and selected it (Select>All). Then I took the Move tool and dragged the "boy" photo over the "background" photo. Now I had a two layer image with the "boy layer" on top. I changed the Opacity of the top layer so I could see the background layer. Then I used the Move tool and keyboard arrows to align the two images. Due to the fact the two photos were handheld, the outside edges of the aligned images did not line up. I cropped the image to trim the edges.

Now for the fun part. I took the Eraser tool and erased the mother's arm and hand from the top layer, revealing the "background" layer underneath. SIMPLE! Certainly easier than using the clone tool to replace the vegetation if I didn't have a "background" photo to use. I used a large eraser except when I was close to the boy, then I used a smaller eraser for more precision.

To the right is a portion of the image with the mother's hand erased and her arm partially erased, revealing the background. The background layer is darker than the top layer. Once the mother was completely erased, Levels and Hue/Saturation were used to make both layers match. The image was then ready to print.

Alignment would have been easier if both photos had been taken with a tripod.

The final image is to the left.

If you know in advance that you are going to digitally remove something or someone from a photo, try this technique. It will make your project easier.

December 25, 2003
Updated Jan 30, 2004

[Home] [Gallery] [Nature] [Travel] [Learn] [Tips] [Digital] [Links] [About]

Shop at Adorama - one of the best, largest, and most reliable camera dealers on the internet.

This site and all of its contents are copyrighted. Reproduction in any form is a violation of US and international  copyright laws.