Fixing Digital Camera Files
Jim Doty, Jr. To get the most from your digital camera, you should set the parameters so you get the kind of image files you want. You can read more about this in my Raw vs Jpeg article and my Jpeg Camera Settings
article. This is a new thing for those of you who are used to film cameras. Think of choosing your digital camera settings as being similar to the times you chose a particular film to give you the color palette, grain, color balance, and saturation you wanted for a particular photographic situation.
Having set your digital camera up the way you want it, there are still going to be times that the image you get is not quite like the image you want. I received a call from Bob, my friend,
brother-in-law, and photo buddy all rolled into one. We spent three glorious October days taking pictures in central and southwest Colorado. Bob had recently acquired a Canon D30 camera and this was kind of a shakedown
cruise. He took one of his digital files to his favorite printer and asked for a straight print. He was disappointed in the print he got back. (I should add now that this was not the fault of the Canon D30 camera). He took the same file to another printer, talked over the situation, had another print made and ended up with a much more pleasing result. We would see each other in early December
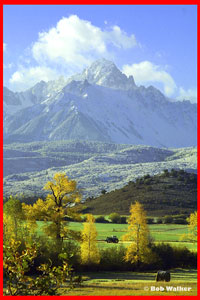
so I asked him to bring both prints along with the digital file. 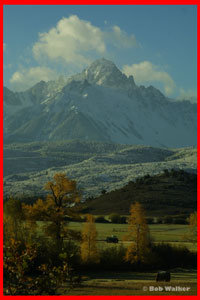 This is what the first print looked like. Since I was there with him when he took the picture, I understood his disappointment. The sky was a wonderful blue, the sun
kissed trees in the near ground were a bright yellow-gold and the grass was a vivid green. That is not what Bob got back from the printer. The whole print is too dark, the trees look more rust colored than bright yellow
gold, and the grass is no where near the green we saw. The whole photo lacks snap. This is what the first print looked like. Since I was there with him when he took the picture, I understood his disappointment. The sky was a wonderful blue, the sun
kissed trees in the near ground were a bright yellow-gold and the grass was a vivid green. That is not what Bob got back from the printer. The whole print is too dark, the trees look more rust colored than bright yellow
gold, and the grass is no where near the green we saw. The whole photo lacks snap.We took Bob's flash card and loaded the digital file into my computer. Surprise, Surprise! The digital file looked
the same on my monitor as the first print Bob received. The printer gave him an excellent reproduction of the digital file. Because he discussed the image with the second printer, the second printer manipulated the
digital file before printing it to give Bob something closer to what he wanted. Of course the first printer could have done exactly the same thing had Bob asked for that. There is a lesson here. Once you find a good
printer, be sure to communicate what you want. When Bob ran a cable from his camera to his TV screen, the image looked better than what he got back in his
first print. Ditto for the image on the screen on the back of his camera. There is another lesson here. You can not ultimately judge an image from the camera viewing screen or by hooking your digital camera to a TV set.
Bob is brand new at this digital camera stuff, and he has learned to check each image's histogram on the back of his camera as an initial check on exposure.
To really view an image, you need to get it into your favorite photo software and view it on a reasonably accurate computer monitor. This will give you a much better clue as to what your file is actually like. The first conclusion I came to was that the digital image had been underexposed. Bracketing is just as valuable on a digital camera as on film. Since each digital image
is essentially free (except for maybe a bigger memory card), take several exposures of each scene and check the histogram of each image if your camera provides that. I also suspected that the inaccurate colors in the
trees and grass might be due to the initial underexposure. I then used Photoshop to digitally fix the image to something more like the original scene. My first step is almost always to go to
LEVELS or AUTO LEVELS. (This is under IMAGE > ADJUST in Photoshop. In Photoshop Elements, LEVELS is found under ENHANCE > BRIGHTNESS/CONTRAST.) By sliding the triangles back and forth under the histogram map, you can change how
light or dark all the pixels in the image are. I moved the triangles until the overall image was lighter, but some parts darker to give the image more snap.
Next I went to HUE/SATURATION to correct the overall color balance of the scene. (This is also under
IMAGE > ADJUST in Photoshop and under ENHANCE > COLOR in Photoshop Elements. By sliding the HUE triangle I shifted the overall look so that the sky, mountains and hills looked right. This was a minor change. By sliding the SATURATION triangle I increased the color intensity of the image just a little. (See my Jpeg Camera Settings
article for more information on saturation.) Now my sky, mountains, and hills looked good, but my foreground trees looked yellow green, not the yellow
gold that I remembered from being there. I again picked HUE/SATURATION
, but this time I picked the color yellow. In the HUE/SATURATION window where it says "EDIT:" I changed the drop down menu from "MASTER" (which is all colors) to "YELLOW." Now the sliders will
only change the pixels with yellow in them. I moved the HUE triangle until my foreground trees went from yellow-green to yellow-gold. Now the digital file was much closer to the colors of the original scene nd I
could have stopped there and had a much better print than either of Bob's two commercially made prints. I decided the grass looked a little too dark and not quite
green enough. In Photoshop (Elements doesn't have this feature) I went to SELECT > COLOR RANGE and clicked my pointer on the green grass. Photoshop then picked all
the areas with similar shades of dark green. By moving the FUZZINESS triangle, you can determine how much is selected. I was easily able to select the grassy areas without including other stuff. I then went to
HUE/SATURATION one more time and slid the HUE and SATURATION triangles until the grass looked right. The digital image was unusually clean, so I did not need to use the CLONE tool to dust spot the image. Once I had the colors the way I wanted, I used LEVELS one more time to tweak the image. I ended up with an image much closer to what I remembered. (In fairness, I should also add that I had my originals slides of the same scene just to
be sure. Of course, if you have been reading at this site, you already know that even color slides are not a truly accurate rendition of a photographic scene since every film has its own unique color quirks
and traits. Film is usually more accurate than your own color memory, it you chose the film well and exposed it properly.)
Total time to do all this was about 40-45 minutes.This is my digitally corrected file. A larger side-by-side version of both photos Once I had the image file the way I wanted it, I used Photoshop's bicubic interpolation to re-size the image up to a 12x18 inch file at 360 pixels per inch. Then I printed
it out on my Epson 2200. It is a great image and much truer to the original scene. Instead of printing it myself, I could have taken it to a commercial printer for final
output. You can do the same with your digital files. (I should add that technically speaking it should not be possible to
take a file from 3 megapixel camera and re-size it enough to get a good quality 12x18 inch print. That is usually true. But all pixels are not created equal and Canon D30 files can regularly produce larger
high quality prints than many 4 and 5 megapixel point and shoot cameras.) |