CONTROLLING DEPTH OF FIELD
by Jim Doty, Jr.
Note to digital camera users: This article was originally written with 35mm film cameras in mind. The principles involved are the same for all film and digital
formats, but the values for C in the formula below only apply to 35mm film cameras and digital bodies with a "full frame" sensor. If your digital camera has a full frame sensor, stay on this page. If you have a digital
camera with a field of view (FOV) crop, a digital version of this article appears here
. Since there are several combinations of apertures and shutter speeds that will give the same
exposure on film (see the exposure
article), how does a photographer choose which combination to use in a given situation? The answer to this question is what gives photographers creative control over their images. It is the specific combination of aperture and shutter speed that a photographer chooses that determines the depth of field in the image, as well as subject motion, if any.
Depth of Field (DOF) is how much of the image from near to far looks sharp. A landscape photo in which everything looks sharp (from the flowers a few inches from the camera lens to the mountains far in the
distance) is said to have a lot of DOF. A photo of a field of flowers in which just one flower looks sharp and every thing else is soft and blurry is said to have very little DOF. The wonderful thing about
photography is that the photographer gets to choose how much DOF there is, subject to certain limitations. Unfortunately, DOF can't be determined by simply looking
through the camera lens. Whenever you look through the viewfinder of a single lens reflex camera, you are looking through the lens, BUT you are looking through the lens at its widest aperture. If you take
the picture with the camera set at a smaller aperture, the DOF will be different than what you saw looking through the lens.The exception to this is if you have a DOF Preview button on your camera. A "Depth of
Field Preview Button" is one of the most valuable features a camera can have. Some inexpensive cameras have DOF Preview, and some expensive ones do not. The next time you purchase a camera body, you should consider
getting one that has DOF Preview. By pushing the DOF Preview button when looking through your camera lens, THE LENS STOPS DOWN TO THE TAKING APERTURE so you can see the final look of your photograph. Because the lens
is stopped down, what you see through the viewfinder will look much darker than usual when you are checking DOF. What creates depth of field? A point of light that is properly focused on the film plane becomes a
point of light on the film. If the point of light is not focused on the film plane, it will create a small circle on the film plane, called a circle of confusion. Most eyes can't distinguish between a point and a circle smaller than 1/100 inch. As long as the circle of confusion on the film is not enlarged beyond 1/100 inch on the
print, it appears in focus. This is what makes DOF possible. An image on film is made up of lots of points of light that show up on the film. Even though the camera lens is only focused on one plane at a certain
distance from the lens, if the other points of light form small enough circles of confusion on film, they will appear sharp to the human eye.DOF is a function of how much those points of light are magnified or
enlarged when the circles of confusion on film (or the digital sensor) are enlarged on the final print. That is why the same image may appear to have enough depth of field on an 8x10 enlargement but not on a 16x20
enlargement. The more the circles of confusion are magnified, the less depth of field there appears to be in the final print. Practically speaking, there are three things photographers can do "in the field" to control
DOF. 1) With the same lens at the same focused distance, DOF INCREASES WITH SMALLER LENS APERTURES. F/8 has more depth of field than f/4. F/16 has
more DOF than f/8.2) With the same lens and the same aperture, DOF INCREASES AS THE FOCUSED DISTANCE INCREASES. If you are four feet from the subject your lens is focused on, you will have more DOF than
if you are 2 feet from the subject your lens is focused on. If you are 8 feet from the focused subject, you will have more DOF than if you are 4 feet from the focused subject. 3) With the same focused distance and the same aperture, SHORTER LENS FOCAL LENGTHS HAVE MORE DOF THAN LONGER LENS FOCAL LENGTHS. If you have three lenses (24mm, 50mm,
and 100mm), all set at f/8 and all focused on a subject 10 feet away, the 24 mm lens will have the most DOF and the 100 mm lens will have the least. The 50 mm lens will have more than the 100 mm but less
than the 24 mm. If you want to increase DOF, use a small lens aperture, use a wider angle lens, or get farther away from the focused subject, or a combination of all
three. To minimize DOF, use a longer focal length lens, use a wider lens aperture, or get closer to your subject, or a combination of all three.With the exception of closeup or macro photography, you have more
depth of field behind the point of focus than in front of the point of focus. HYPERFOCAL DISTANCE One very handy way to achieve a lot of depth of field for landscape photos, even if your camera does not have a depth of field preview button, is to use the hyperfocal distance for
the lens and aperture in use.With a given lens focal length and a given lens aperture, the HYPERFOCAL DISTANCE IS THE FOCUSED DISTANCE THAT WILL KEEP EVERYTHING LOOKING SHARP FROM HALF THE HYPERFOCAL
DISTANCE TO INFINITY. It gives you the maximum amount of depth of field you can achieve with that lens at that aperture. Using
depth of field scales on lenses to set the hyperfocal distance Some lenses have depth of field scales marked on the lens barrel. This makes finding the
hyperfocal distance easier. A lens is focused at its hyperfocal distance when the infinity focus mark is opposite the f stop in use on the depth of field scale on the lens. The distance opposite the same f
stop at the other end of the depth of field scale shows the near limit of the depth of field. Everything in between will appear in focus. The distance opposite the focus mark (not the depth of field marks)
is the hyperfocal distance for that lens at that aperture.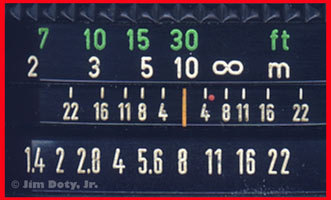
To the left is a 50 mm lens. The bottom row of numbers are the lens apertures in f-stops from f/1.4 to f/22. The lens is set at f/8 (the aperture below the orange mark). Just above the aperture ring
is the depth of field scale with pairs of numbers representing the f-stops from f/4 to f/22. Since the lens is set at an aperture of f/8, the infinity mark on the distance scale
is set opposite the f/8 to the right. Opposite the other f/8 mark is 15 feet. Everything between 15 feet and infinity will appear sharp in the final photo. The hyperfocal distance is 30 feet (the
focused distance in green above the orange mark).
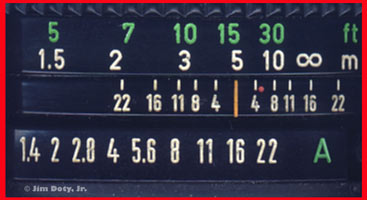
This is the same 50 mm lens except the aperture is now set to f/16. To set the lens for its hyperfocal distance, the infinity mark of the distance scale is set opposite the right hand f/16 of
the depth of field scale. The distance opposite the left hand f/16 of the distance scale is about 7.5 feet. Everything from 7.5 feet to infinity will appear sharp in the final photo. The hyperfocal
distance is about 15 feet.
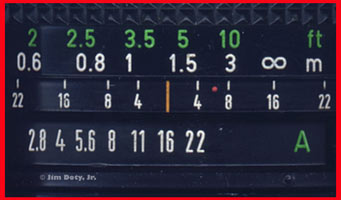 This is a 24 mm wide angle lens. The
aperture is set to f/16 and the lens has been set with the infinity mark opposite the right hand f/16 in the depth of field scale. This sets the lens at its hyperfocal distance for this f-stop. The
hyperfocal distance is a little less than 5 feet (the green distance mark above the orange index line). The left hand depth of field scale for f/16 is
at a distance of a little less than 2.5 feet. Everything from 2.5 feet to infinity will appear sharp in the final photo. This is a 24 mm wide angle lens. The
aperture is set to f/16 and the lens has been set with the infinity mark opposite the right hand f/16 in the depth of field scale. This sets the lens at its hyperfocal distance for this f-stop. The
hyperfocal distance is a little less than 5 feet (the green distance mark above the orange index line). The left hand depth of field scale for f/16 is
at a distance of a little less than 2.5 feet. Everything from 2.5 feet to infinity will appear sharp in the final photo.
If you have a lens with a good DOF scale, it will help you quickly set your lens at its hyperfocal distance.
NOTE: If you are using these lenses on a digital camera body with a field of view (FOV) crop, the depth of field scales WILL NOT WORK. You will need to use a hyperfocal distance chart. Read more here and use the digital chart
here.
If you have a "full frame" digital SLR, the scales on your lenses
designed for 35mm film cameras WILL work on your digital SLR. DOF and Print Size DOF also depends on how large a print you make from your original slide or negative. The bigger you the print you make, the
less DOF you have since you are making the circles of confusion larger. The DOF scale on many lenses will give you good DOF for enlargements up to 8x12 inches. If you want to make bigger
enlargements, set your lens for one or two apertures smaller than the lens scale indicates. This will give you some extra depth of field. If the lens scale says you will have adequate DOF at f/8,
set the infinity mark opposite f/8 on your depth of field scale just as if you were going to use f/8, BUT turn the aperture ring to f/11 if you want a bigger enlargement. (You know from the exposure article at this site that any time you change the lens aperture,
you will need to adjust the shutter speed to have the right exposure). Hyperfocal formula What if your lens doesn't have a depth of field scale? You can figure out the depth of field mathematically, design your own
depth of field chart, or use the one I provide at this site.The hyperfocal distance is a mathematical calculation based on film format size, lens focal length, f-stop and desired enlargement
size. More information on this formula can be found in Roger Hicks article in SHUTTERBUG, February 1993, pages 42-49. Unfortunately, I no longer have access to this article.
Calculating the Hyperfocal Distance.
For the mathematically inclined the formula is as follows:
HM = ((F*F)/(C*N))/1000
HM*3.2808 = HF
HM = hyperfocal distance in meters
HF = hyperfocal distance in feet
F = focal length of the lens in mm
N = lens aperture
C = circle of confusion on film in mm.
Use the value given for C for a print of the following sizes::
For an 8x12 inch print, C = .0313
For an 11x16 inch print, C = .0227
For a 16x24 inch print, C = .0156
For a 20x30 inch print, C = .0125
For a 24x36 inch print, C = .0104
For a 30x40 inch print, C = .0083
Example: For an 11x14 enlargement (C = .0227), from a 50 mm lens set at f8:
HM = ((50*50)/(0.0227*8))/1000
HM = (2500/0.1816)/1000
HM = 13766/1000 = 13.766 meters
HF = HM*3.2808
HF = 13.766*3.2808 = 45.16 feet
Using the above formulas, you can design your own chart to your own standards.
My Hyperfocal Distance Chart. If you don't want to create your own chart, you can use mine.
More depth of field information at this site:
Hyperfocal Distance Chart for 35mm film cameras
and digital SLRs with a full frame sensor Depth of Field for Digital SLRs with a FOV crop Hyperfocal Chart for Digital SLRs with a FOV cropMore on Depth of Field Depth of Field software for Palm, Visor, and other PDAs
March 1, 2001
Updated September 11, 2006
|